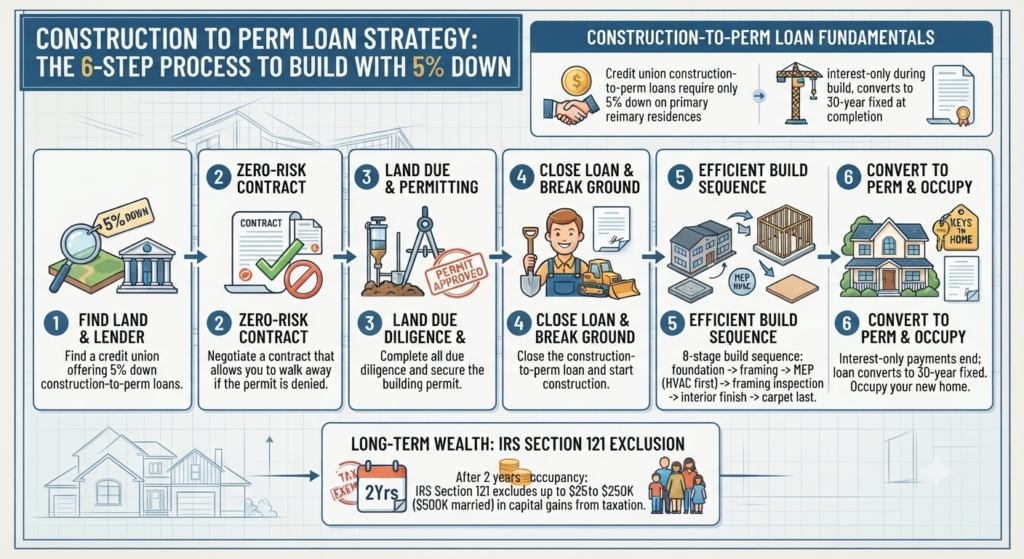
The construction to perm loan strategy is one of the most underused tools in residential real estate — and it’s sitting at your local credit union right now.
Most people think building a home requires significant capital upfront. The construction to perm loan strategy changes that math entirely. Here’s the complete six-step process, from pre-approval to certificate of occupancy.
Step 1 — Pre-Approval: The 5% Down Structure
The construction to perm loan strategy starts at a credit union, not a big bank.
Local credit unions offer primary residence construction-to-permanent loans that require only 5% down — based on your personal financials and credit, not the value of the land or the completed home. The structure works like this:
During the construction period — typically twelve months — you pay interest only on the amount drawn. As construction draws are released in stages, your interest payment grows incrementally. You’re not paying interest on the full loan amount from day one.
When construction is complete and the certificate of occupancy is issued, the loan automatically converts to a 30-year fixed mortgage. Total loan term: 31 years.
For comparison: a private lender or hard money loan for an investment property typically requires 15% or more down. The construction to perm loan strategy at 5% is available specifically because you’re building a primary residence — the bank’s risk profile is different.
Step 2 — Site Selection and the Rule of 20
Before you go under contract on any land, the Rule of 20 needs to work.
The Rule of 20: The land price should be approximately 20% of the completed home’s projected value. If the finished home will appraise at $700,000, your land budget is $140,000.
The 20% equity floor: Total project cost — land plus construction — must leave at least 20% equity at completion. That cushion is your protection against cost overruns, market softening, or appraisal surprises.
Example with a $500,000 pre-approval plus $25,000 (5%) down — total budget $525,000:
- Projected completed value: $700,000
- Land allocation (20%): $140,000
- Construction budget: $360,000
- Projected equity at completion: $140,000–$175,000
Before going under contract, confirm three things about any parcel: sewer or septic feasibility, water access (municipal or well), and power availability. And confirm the zoning allows your intended structure — single-family, duplex, or otherwise.
Step 3 — Design: Drafter vs. Architect
For most residential projects under five units and under three stories, a licensed architect is not legally required. A drafter produces construction drawings at approximately $1 per square foot. An architect typically charges $3 per square foot or more.
On a 2,000 square foot home, that’s $2,000 versus $6,000 or more for the same set of drawings. Use a drafter unless your project’s complexity, scale, or local code specifically requires a licensed architect.
The drawings produced at this stage go to the municipality for permit review — and to the bank for the construction loan underwriting.
Step 4 — Permits and the Zero-Risk Contract Structure
This is the move most people don’t know about.
When you go under contract on land for a construction to perm loan strategy project, negotiate a 2 to 5 month contingency period before you close. You do not pay the land balance until the building permit is approved.
If the permit is denied — wrong zoning, utility issue, setback problem — you walk away. The land seller keeps your earnest money deposit, but your full purchase price is protected. You haven’t bought land you can’t build on.
The moment the permit is approved, you close on the land and the construction loan funds simultaneously. Risk eliminated at the point where it matters most.
Step 5 — Construction: The 8-Stage Sequence
The construction to perm loan strategy requires understanding the build sequence — not to manage it yourself, but to monitor it intelligently. Work with a spec builder (not a custom builder) who thinks like an investor. Builder fee: typically 8 to 15% of construction cost, with 10% being standard.
Stage 1 — Survey and excavation. A surveyor marks the foundation footprint. Excavation clears and levels the site. A second survey confirms the foundation placement is correct before concrete is poured.
Stage 2 — Foundation. Forms are set, concrete is poured, and the foundation cures. This is the most critical structural element — errors here are expensive to correct later.
Stage 3 — Post, beam, and sub-floor plumbing. Before the floor deck goes down, the plumber runs all under-floor drain lines through the crawl space or slab. Access is easy now. After the floor is closed, it’s not.
Stage 4 — Framing. First floor walls, second floor structure if applicable, and roof trusses go up. Once framing is complete, windows are ordered — lead times on windows can run 4 to 8 weeks, so ordering at framing completion prevents delays later.
Stage 5 — Exterior weatherproofing. Roof, exterior siding, and gutters are installed. The building envelope needs to be closed before interior work begins — moisture is the enemy of drywall and insulation.
Stage 6 — MEP (Mechanical, Electrical, Plumbing). HVAC goes in first because the ductwork requires the most routing flexibility. Once HVAC is placed, wall plumbing and electrical rough-in follow. Sequencing matters here — doing electrical before HVAC creates conflicts that slow the job.
Stage 7 — Framing inspection. The municipality inspects the structure and all rough-in MEP work against the engineered drawings. Nothing gets covered until this inspection passes. This is the most important milestone in the construction to perm loan strategy build process.
Stage 8 — Interior finish sequence. Insulation → drywall → cabinets → flooring → trim and doors → countertops → paint → fixtures and lighting → carpet last. Carpet goes in last because everything else creates dust, debris, and scuff risk. Install it early and you’ll install it twice.
Exterior finish runs concurrent: driveway concrete, fence posts, landscaping, and fence completion happen as interior finish work wraps up.
Step 6 — Certificate of Occupancy and Loan Conversion
When construction is complete, the municipality issues a Certificate of Occupancy — the legal confirmation that the home was built to code and is safe to occupy.
You submit the CO to the bank. The bank orders a final appraisal to confirm the home was built as specified in the loan documents. Once the appraisal is complete, the construction loan converts automatically to a 30-year fixed mortgage.
The tax benefit: Under IRS Section 121, if you occupy the completed home as your primary residence for at least two years before selling, you can exclude up to $250,000 in capital gains from taxation ($500,000 for married couples). On a home where you built in $140,000 to $175,000 in equity at completion, two years of appreciation could put a significant portion of that gain in the tax-free zone.
According to the Consumer Financial Protection Bureau, construction-to-permanent loans are one of the most efficient financing structures for owner-builders because they eliminate the need to refinance after construction — saving both closing costs and the risk of qualifying for permanent financing in a changed rate environment.
Use the House Build Cost Calculator to build your full project budget before you apply for pre-approval. The bank will want to see detailed cost estimates for every phase — having them ready before your first meeting shows you know what you’re doing.
Not financial advice — just someone doing a lot of research and asking a lot of questions.